Thursday, 13 July 2017

3D CAMERA PROJECTION 2

CAMERA PROJECTION

Camera projection can transform a 2-D image into a 3-D scene, complete with a moving camera and shifting perspective. 

This technique is mainly used to project textures or images on a geometry and it saves a lot of time in creating a realistic scene for a movie or a shot.

In this blog, we will try and use 3ds max and nuke's powerful tool set to add perspective and animation to a simple image and convert it into a 3-D scene. 

First, we will create a rough geometry inside 3ds max to match the image, and then project the reference image to give them depth and realism. 

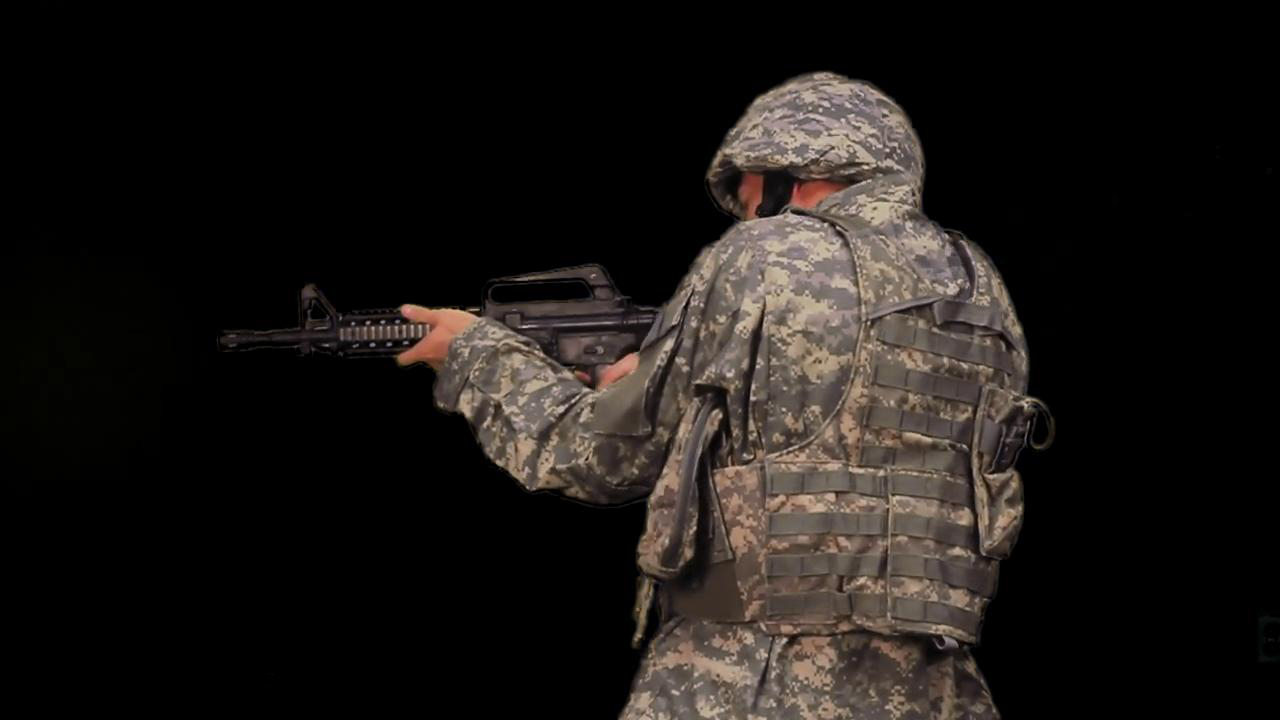
The reference image we will use for this procedure is :


If we zoom inside this image we do not get the depth information or the feel that it is real

So in order to create depth let us start by creating a 3-D geometry in 3ds max
We match the view while creating the geometry and make sure the camera is aligned properly to the scene.


Now we export this geometry and camera to Nuke and use the Project3d node to project the texture or the reference image on to the geometry.


The resultant projection provides depth and projects the image on the 3-D object

The node graph in nuke after our complete composite looks something like below :


Finally we can see the 2-D image converted into a 3-D video which includes depth and realism, All thanks to camera projection


Hope it was a good learning experience.

Till next time, 


Keep Animating and Keep Learning!!!

3D MATTE PAINTING ( UPDATED )


3D MATTE PAINTING

Ever wondered how locations and backgrounds in many feature films are created even when they do not exist in reality

The answer is simple:

Matte painting
(A matte painting is a painted representation of a landscape, set, or distant location that allows filmmakers to create the illusion of an environment that is not present at the filming location.)

But what is a 3-D Matte Painting?

Traditionally, matte paintings were made by artists using paints or pastels on large sheets of glass for integrating with the live-action footage

Paint has now been superseded by digital images created using photo references, 3-D models, and drawing tablets. 
Matte painters combine their digitally matte painted textures within computer-generated 3-D environments, allowing for 3-D camera movement

This allows for a realistic looking 3-D environment in which a the camera can move up to a 180 degree rotation

It is not easy to understand so we dive into this technique with a little example:

A digital matte paint is made of many images cut and put together, so we cut out and make a group of such images


 A good combination of these images and a little touch ups, 
and 
POOF!!!
we create our very own matte painting


The product is a complete background which can be used in a scene with a fixed camera

But what if the camera moves or is animated ?

We then create a 3-D Matte painting using Software like Nuke, Fusion, After Effects and so on

This software combines these images and produces a moving camera matte painting which consists of compositing principles like parallax , light information , depth to it

here we can see the composition in Nuke with all its node graph for the same scene but in 3-D


Here is a camera and single elements view which shows the placement of the different parts of the matte paintings at different positions to create 3-D depth


now we add in some fog that i rendered in fumefx

The result of our hard work in this composition is :


Stay tuned to work together on more fun projects and till next time I leave you with a fun quote:


CHROMA KEYING 2

Chroma Keying


Chroma key compositing, or chroma keying, is a visual effects technique for compositing (layering) two images of video streams together based on color hues (chroma range). 

The technique has been used heavily in many fields to remove a background from the subject of a photo or video – particularly the newscasting, motion picture and videogame industries. 

A color range in the foreground footage is made transparent, allowing separately filmed background footage or a static image to be inserted into the scene.

We will use a similar technique to replace a green screen background from a video and replace it with a background of our choice and blend the two in effect.

The original video to be used by us is :


Here we will remove the background greens and replace it with this background : 


to begin with we use a software called nuke and in nuke we use primatte node to remove the greens from the background and we are left with an extracted video


we add a little color correction and blur to reduce the spills and to tone the character and we have a chroma keyed video


Now we add in a muzzle flash to give a bullet firing effect to the clip
For this we again take a muzzle firing green screen clip as below:


We now use another primatte node again to remove the greens from the muzzle flash clip


now we add a transform node and bring adjust the muzzle flash onto the gunpoint


we now track the footage and attach the muzzle flash onto the gunpoint so that the firing moves with the gun
and then add some light to show a little bullet burst lighting on the main character


we now add the background to the clip and adjust and make some color corrections


we also add in some fog to show a war effect


now we finally go through the nodes and see our complete composition


The final output is:


hope you like it!!!

Till next time keep animating and learning.


Wednesday, 12 July 2017

CHROMA KEYING ( UPDATED )


Chroma Keying


Chroma key compositing, or chroma keying, is a visual effects technique for compositing (layering) two images of video streams together based on color hues (chroma range). 

The technique has been used heavily in many fields to remove a background from the subject of a photo or video – particularly the newscasting, motion picture and videogame industries. 

A color range in the foreground footage is made transparent, allowing separately filmed background footage or a static image to be inserted into the scene.

We will use a similar technique to replace a green screen background from a video and replace it with a background of our choice and blend the two in effect.

The original video to be used by us is :


Here we will remove the background greens and replace it with the this background : 


to begin with we use a software called nuke and in nuke we use ibkcolor and ibkgizmo to remove the greens from the background and we are left with an extracted video


the output still has traces of greens around the characters edges

In order to remove that we use a erode node(Dilate) with a combination of premult node and we end up with a result which is something like this


we add a little color correction and blur to reduce the spills and to tone the character and we have a chroma keyed video 


Now we add in the background that we wanted to place before hand and merge the two together


We still have the markers which were there in the green screen videos so in order to remove them we do masking and remove them and we end up with the final result of the two videos


now we finally go through the nodes and see our complete composition


the final composition is as follows:


hope you like it!!!

Till next time keep animating and learning.

3D CAMERA PROJECTION 2

CAMERA PROJECTION Camera projection can transform a 2-D image into a 3-D scene, complete with a moving camera and shifting perspective...